Projectile Weapons
Goal
Add projectile attacks to the Crystal Sword from the Create a Crafting Bench tutorial. You will create a custom damage element, craftable ammo, and two projectile attacks: a charged bolt that consumes ammo on thrust, and a special orb that fires when SignatureEnergy is full.
What You’ll Learn
- How
Projectiledefinitions andProjectileConfigfiles work together - How
Type: "Projectile"interactions fire projectiles from weapons - How
Type: "Charging"creates hold-to-charge attacks with a progress bar - How
Type: "ModifyInventory"consumes ammo with a fallback on failure - How
EntityStatsOnHitgenerates SignatureEnergy from projectile hits - How
InteractionVarsoverride vanilla sword behavior without replacing the full chain
Prerequisites
- The Crystal Anvil mod from Create a Crafting Bench
- The Crystal Glow block mod from Create a Custom Block
- The Enchanted Tree mod from Custom Trees and Saplings
Companion mod repository: hytale-mods-custom-projectile (v2.0.0)
Projectile System Overview
Hytale’s projectile system has three layers:
| Layer | Location | Purpose |
|---|---|---|
| Projectile Definition | Server/Projectiles/ | The projectile entity: appearance, physics, hitbox, base damage |
| Projectile Config | Server/ProjectileConfigs/ | Launch settings: force, spawn offset, sounds, and hit/miss interaction chains |
| Weapon Interaction | Server/Item/Interactions/ | Type: "Projectile" with a Config reference that fires the projectile |
The flow is:
Player holds attack → Charging interaction (1s) → ModifyInventory (consume ammo) → Success: Thrust animation + Projectile fires from sword tip → Failed (no ammo): Normal thrust attackStep 1: Create a Custom Damage Element
Create a new damage type so crystal projectiles deal their own element of damage with a distinct color.
Server/Entity/Damage/Crystal_Light.json{ "Parent": "Elemental", "Inherits": "Elemental", "DamageTextColor": "#88ccff"}The Parent and Inherits fields make Crystal Light behave like other elemental damage (affected by elemental resistance). The DamageTextColor controls the floating damage number color — light blue to match the crystal theme.
Vanilla damage elements like Fire, Ice, and Nature follow the same pattern. You can reference your custom element by name ("Crystal_Light") in any BaseDamage object.
Step 2: Create Projectile Definitions
Projectile definitions describe the physical entity that travels through the world. Create two: a fast bolt for the charged attack and a large orb for the special attack.
Crystal Light Bolt
Server/Projectiles/Crystal_Light_Bolt.json{ "Appearance": "Ice_Bolt", "Radius": 0.2, "Height": 0.2, "HorizontalCenterShot": 0.2, "VerticalCenterShot": 0.1, "DepthShot": 1.5, "PitchAdjustShot": true, "SticksVertically": false, "MuzzleVelocity": 55, "TerminalVelocity": 60, "Gravity": 2, "ImpactSlowdown": 0, "TimeToLive": 10, "Damage": 18, "DeadTimeMiss": 0, "DeathEffectsOnHit": true, "HitParticles": { "SystemId": "Impact_Ice" }, "DeathParticles": { "SystemId": "Impact_Ice" }, "HitSoundEventId": "SFX_Ice_Break", "DeathSoundEventId": "SFX_Ice_Break"}Crystal Light Orb
Server/Projectiles/Crystal_Light_Orb.json{ "Appearance": "Ice_Ball", "Radius": 2.5, "Height": 0.3, "HorizontalCenterShot": 0.2, "DepthShot": 1, "PitchAdjustShot": false, "SticksVertically": false, "MuzzleVelocity": 35, "TerminalVelocity": 45, "Gravity": 3, "Damage": 36, "DeathEffectsOnHit": true, "TimeToLive": 5, "DeadTimeMiss": 0, "ImpactSlowdown": 0, "VerticalCenterShot": 0, "HitParticles": { "SystemId": "Impact_Ice" }, "DeathParticles": { "SystemId": "IceBall_Explosion" }, "MissParticles": { "SystemId": "IceBall_Explosion" }, "DeathSoundEventId": "SFX_Ice_Ball_Death"}Key Differences
| Property | Bolt | Orb |
|---|---|---|
Appearance | Ice_Bolt (small, arrow-like) | Ice_Ball (large sphere) |
MuzzleVelocity | 55 (fast) | 35 (slower) |
Gravity | 2 (flat trajectory) | 3 (slight arc) |
Radius | 0.2 (narrow) | 2.5 (wide splash) |
Damage | 18 | 36 (double) |
Step 3: Create Projectile Configs
Projectile Configs connect the weapon interaction to the projectile. They define launch force, spawn position, sounds, and what happens on hit or miss.
Bolt Config
Server/ProjectileConfigs/HytaleModdingManual/Projectile_Config_Crystal_Light_Bolt.json{ "Parent": "Projectile_Config_Arrow_Base", "Model": "Ice_Bolt", "Physics": { "Type": "Standard", "Gravity": 2, "TerminalVelocityAir": 60, "TerminalVelocityWater": 15, "RotationMode": "VelocityDamped", "Bounciness": 0.0, "SticksVertically": false }, "LaunchForce": 55, "SpawnOffset": { "X": 0.3, "Y": -0.3, "Z": 1.5 }, "LaunchLocalSoundEventId": "SFX_Ice_Break", "LaunchWorldSoundEventId": "SFX_Ice_Break", "Interactions": { "ProjectileHit": { "Interactions": [ "Crystal_Light_Bolt_Damage", "Common_Projectile_Despawn" ] }, "ProjectileMiss": { "Interactions": [ "Common_Projectile_Miss", "Common_Projectile_Despawn" ] } }}The SpawnOffset controls where the projectile appears relative to the player. Z: 1.5 pushes it forward to the sword tip. Y: -0.3 lowers it from head height.
Parent: "Projectile_Config_Arrow_Base" inherits default arrow physics and spawn rotation. We override Physics, LaunchForce, and SpawnOffset for our crystal bolt behavior.
Orb Config
Server/ProjectileConfigs/HytaleModdingManual/Projectile_Config_Crystal_Light_Orb.json{ "Parent": "Projectile_Config_Arrow_Base", "Model": "Ice_Ball", "Physics": { "Type": "Standard", "Gravity": 3, "TerminalVelocityAir": 45, "TerminalVelocityWater": 10, "RotationMode": "VelocityDamped", "Bounciness": 0.0, "SticksVertically": false }, "LaunchForce": 35, "LaunchLocalSoundEventId": "SFX_Ice_Ball_Death", "LaunchWorldSoundEventId": "SFX_Ice_Ball_Death", "Interactions": { "ProjectileHit": { "Interactions": [ "Crystal_Light_Orb_Damage", "Common_Projectile_Despawn" ] }, "ProjectileMiss": { "Interactions": [ "Common_Projectile_Miss", "Common_Projectile_Despawn" ] } }}Step 4: Create Damage Interactions
Damage interactions define what happens when a projectile hits an entity. They specify damage amounts, knockback, particles, sounds, and stat generation.
Bolt Damage
Server/Item/Interactions/HytaleModdingManual/Crystal_Light_Bolt_Damage.json{ "Parent": "DamageEntityParent", "DamageCalculator": { "BaseDamage": { "Crystal_Light": 18 } }, "DamageEffects": { "Knockback": { "Type": "Force", "VelocityConfig": { "AirResistance": 0.97, "AirResistanceMax": 0.96, "GroundResistance": 0.94, "GroundResistanceMax": 0.3, "Threshold": 3.0, "Style": "Exp" }, "Direction": { "X": 0.0, "Y": 1, "Z": -3 }, "Force": 8, "VelocityType": "Add" }, "WorldParticles": [ { "SystemId": "Impact_Ice", "Scale": 1 } ], "WorldSoundEventId": "SFX_Ice_Break", "EntityStatsOnHit": [ { "EntityStatId": "SignatureEnergy", "Amount": 5 } ] }}Orb Damage
Server/Item/Interactions/HytaleModdingManual/Crystal_Light_Orb_Damage.json{ "Parent": "DamageEntityParent", "DamageCalculator": { "BaseDamage": { "Crystal_Light": 36 } }, "DamageEffects": { "Knockback": { "Type": "Force", "VelocityConfig": { "AirResistance": 0.97, "AirResistanceMax": 0.96, "GroundResistance": 0.94, "GroundResistanceMax": 0.3, "Threshold": 3.0, "Style": "Exp" }, "Direction": { "X": 0.0, "Y": 3, "Z": -1 }, "Force": 20, "VelocityType": "Set" }, "WorldParticles": [ { "SystemId": "Impact_Ice", "Scale": 1 }, { "SystemId": "IceBall_Explosion", "Scale": 1 } ], "WorldSoundEventId": "SFX_Ice_Ball_Death", "EntityStatsOnHit": [ { "EntityStatId": "SignatureEnergy", "Amount": 10 } ] }}SignatureEnergy Generation
The EntityStatsOnHit array is key to the sword’s progression loop. Each bolt hit grants +5 SignatureEnergy, and each orb hit grants +10. When SignatureEnergy reaches 100%, the special attack becomes available. This creates a gameplay loop: use charged attacks to build energy, then unleash the powerful orb.
Step 5: Create the Ammo Item
Light Charges are the ammo consumed by the charged attack. They are crafted at the Crystal Anvil in batches of 50.
Server/Item/Items/HytaleModdingManual/Weapon_Arrow_Crystal_Glow.json{ "TranslationProperties": { "Name": "server.items.Weapon_Arrow_Crystal_Glow.name", "Description": "server.items.Weapon_Arrow_Crystal_Glow.description" }, "Categories": [ "Items.Weapons" ], "Quality": "Uncommon", "ItemLevel": 25, "PlayerAnimationsId": "Dagger", "Recipe": { "TimeSeconds": 5.0, "KnowledgeRequired": false, "Input": [ { "ItemId": "Plant_Fruit_Enchanted", "Quantity": 1 }, { "ItemId": "Ore_Crystal_Glow", "Quantity": 1 }, { "ItemId": "Weapon_Arrow_Crude", "Quantity": 10 } ], "OutputQuantity": 50, "BenchRequirement": [ { "Type": "Crafting", "Categories": [ "Crystal_Glow" ], "Id": "Armory_Crystal_Glow" } ] }, "Model": "Items/Weapons/Arrow/Arrow.blockymodel", "Texture": "Items/Weapons/Arrow/Crude_Texture.png", "Icon": "Icons/ItemsGenerated/Weapon_Arrow_Crude.png", "MaxStack": 100, "Tags": { "Type": [ "Weapon" ], "Family": [ "Arrow" ] }, "Weapon": {}, "Light": { "Radius": 1, "Color": "#88ccff" }, "ItemSoundSetId": "ISS_Weapons_Arrows"}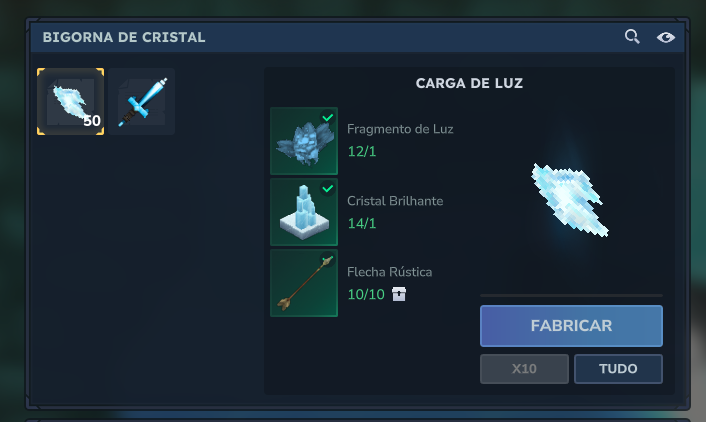
Key points:
OutputQuantity: 50produces 50 charges per craft — important for ammo items that get consumed quickly- No
InteractionsorInteractionVars— this item is ammo only, not a weapon you can swing - The
Weapon: {}empty object is required so the item appears in weapon categories MaxStack: 100allows carrying a reasonable supply
Step 6: Create the Shooting Interactions
These are simple Type: "Projectile" interactions that fire each projectile. They must be named files, not inlined — Hytale validates interactions by asset ID and inline projectile interactions can fail validation.
Bolt Shot
Server/Item/Interactions/HytaleModdingManual/Crystal_Sword_Shoot_Bolt.json{ "Type": "Projectile", "Config": "Projectile_Config_Crystal_Light_Bolt", "Next": { "Type": "Simple", "RunTime": 0.2 }}Orb Shot
Server/Item/Interactions/HytaleModdingManual/Crystal_Sword_Shoot_Orb.json{ "Type": "Projectile", "Config": "Projectile_Config_Crystal_Light_Orb", "Next": { "Type": "Simple", "RunTime": 0.2 }}The Config field references the ProjectileConfig by filename (without .json). The Next block adds a short cooldown after firing.
Step 7: Create the Charging Interaction
The charging interaction requires the player to hold the attack button for 1 second before the charged attack triggers.
Server/Item/Interactions/HytaleModdingManual/Crystal_Sword_Charge.json{ "Type": "Charging", "AllowIndefiniteHold": false, "DisplayProgress": true, "HorizontalSpeedMultiplier": 0.5, "Next": { "0": "Weapon_Sword_Primary_Thrust", "1.0": "Crystal_Sword_Charged_Entry" }}| Field | Purpose |
|---|---|
AllowIndefiniteHold | false means auto-fire when the highest threshold is reached |
DisplayProgress | Shows the charge bar above the hotbar |
HorizontalSpeedMultiplier | Slows movement while charging (0.5 = half speed) |
Next | Maps charge thresholds (in seconds) to interactions |
The thresholds work as “highest reached”:
- Release before 1.0s → executes
"0"→ normal vanilla thrust (no ammo consumed) - Hold for 1.0s → auto-fires
"1.0"→ charged entry with projectile
Step 8: Create the Charged Entry
This is the core of the charged attack. It checks for ammo, consumes it, plays the thrust animation, and fires the bolt.
Server/Item/Interactions/HytaleModdingManual/Crystal_Sword_Charged_Entry.json{ "Type": "ModifyInventory", "ItemToRemove": { "Id": "Weapon_Arrow_Crystal_Glow", "Quantity": 1 }, "AdjustHeldItemDurability": -0.3, "Next": { "Type": "Parallel", "Interactions": [ { "Interactions": [ "Weapon_Sword_Primary_Thrust" ] }, { "Interactions": [ { "Type": "Simple", "RunTime": 0.6 }, "Crystal_Sword_Shoot_Bolt" ] } ] }, "Failed": "Weapon_Sword_Primary_Thrust"}How it works
ModifyInventorychecks if the player has 1Weapon_Arrow_Crystal_Glowin inventory- If yes (
Next): removes the ammo, reduces durability by 0.3, then runs aParallel:- Branch 1: Plays the vanilla thrust animation (
Weapon_Sword_Primary_Thrust) - Branch 2: Waits 0.6 seconds (timing the projectile to the end of the thrust animation), then fires the bolt
- Branch 1: Plays the vanilla thrust animation (
- If no ammo (
Failed): performs a normal thrust with no projectile
The Parallel is essential for timing — it lets the projectile fire at the exact moment the thrust animation reaches full extension (0.6s), rather than waiting for the entire animation to complete.
Step 9: Create the Special Attack
The special attack fires a powerful Crystal Light Orb when SignatureEnergy reaches 100%.
Root Interaction
Server/Item/RootInteractions/HytaleModdingManual/Crystal_Sword_Special.json{ "Interactions": [ "Crystal_Sword_Special" ]}Special Interaction
Server/Item/Interactions/HytaleModdingManual/Crystal_Sword_Special.json{ "Type": "StatsCondition", "Costs": { "SignatureEnergy": 100 }, "ValueType": "Percent", "Next": { "Type": "Serial", "Interactions": [ { "Type": "Parallel", "Interactions": [ { "Interactions": [ { "Type": "Simple", "RunTime": 0.4, "Effects": { "ItemPlayerAnimationsId": "Sword", "ItemAnimationId": "Thrust", "ClearAnimationOnFinish": true, "Particles": [ { "SystemId": "IceBall", "TargetNodeName": "Handle", "PositionOffset": { "X": 1.0, "Y": 0, "Z": 0 } } ] } } ] }, { "Interactions": [ "Crystal_Sword_Shoot_Orb" ] } ] }, { "Type": "ChangeStat", "StatModifiers": { "SignatureEnergy": -100 }, "ValueType": "Percent" } ] }}The flow:
StatsConditionchecks if SignatureEnergy is at 100% — if not, nothing happensParallelruns the thrust animation (with IceBall particles on the blade) alongside the orb projectileChangeStatdrains all SignatureEnergy after the attack
Step 10: Wire Everything to the Sword
Update Weapon_Sword_Crystal_Glow.json to connect all the new systems. The key changes are in Interactions, InteractionVars, and Weapon:
{ "Parent": "Template_Weapon_Sword", "Interactions": { "Primary": "Root_Weapon_Sword_Primary", "Secondary": "Root_Weapon_Sword_Secondary_Guard", "Ability1": "Crystal_Sword_Special" }, "InteractionVars": { "Thrust_Damage": { "Interactions": [ { "Parent": "Weapon_Sword_Primary_Thrust_Damage", "DamageCalculator": { "BaseDamage": { "Physical": 20, "Crystal_Light": 12 } } } ] }, "Thrust_Stamina": { "Interactions": [ "Crystal_Sword_Charge" ] } }, "Weapon": { "EntityStatsToClear": [ "SignatureEnergy" ], "StatModifiers": { "SignatureEnergy": [ { "Amount": 20, "CalculationType": "Additive" } ] } }, "ItemAppearanceConditions": { "SignatureEnergy": [ { "Condition": [100, 100], "ConditionValueType": "Percent", "Particles": [ { "SystemId": "Sword_Signature_Ready", "TargetNodeName": "Handle", "PositionOffset": { "X": 0.8 }, "TargetEntityPart": "PrimaryItem" } ] } ] }}What each section does
Interactions — Binds attack buttons to interaction chains:
Primaryuses vanilla sword primary (Root_Weapon_Sword_Primary) — this preserves the full swing comboAbility1binds to our custom special attack
InteractionVars — Overrides specific parts of the vanilla chain without replacing it:
Thrust_Damageadds Crystal_Light damage to the thrustThrust_Staminareplaces the stamina check with our charging interaction — this is how the charged projectile attack hooks into the existing sword combo
Weapon — Configures SignatureEnergy:
StatModifiersadds 20 max SignatureEnergy when equippedEntityStatsToClearresets energy when the weapon is unequipped
ItemAppearanceConditions — Shows glowing particles on the sword when SignatureEnergy reaches 100%, signaling the special attack is ready.
Step 11: Test In-Game
-
Copy the
CreateACraftingBench/folder to%APPDATA%/Hytale/UserData/Mods/ -
Make sure the CreateACustomBlock and CustomTreesAndSaplings mods are also installed (required dependencies)
-
Launch Hytale and craft Light Charges at the Crystal Anvil
-
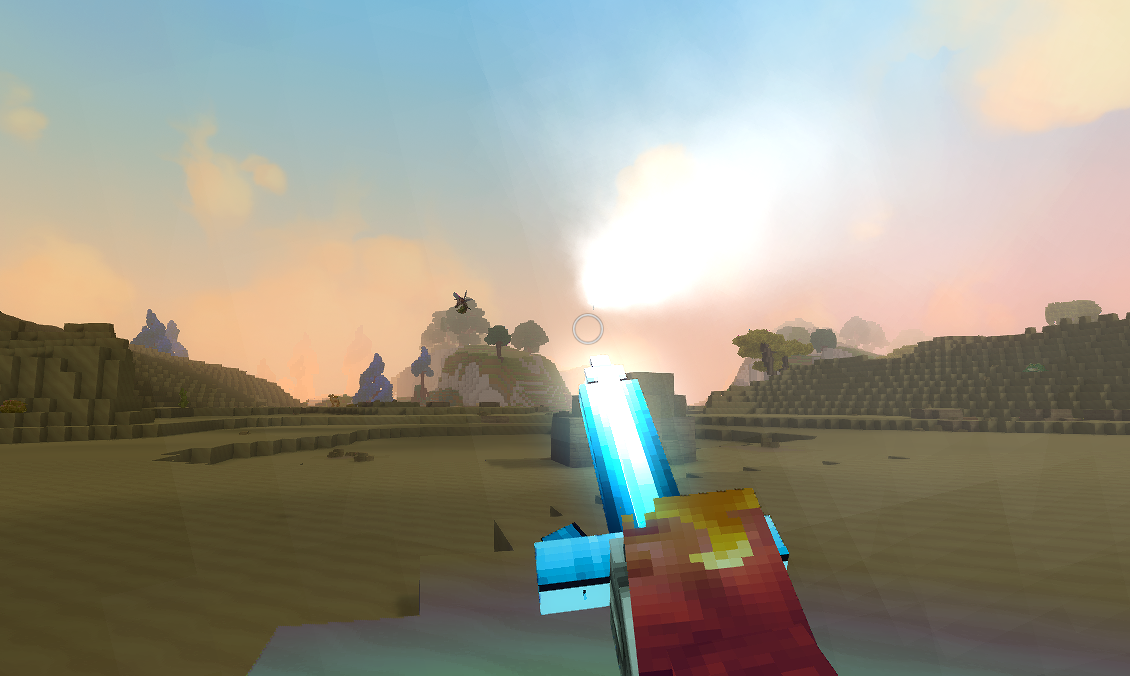
Test the charged attack:
- Equip the Crystal Sword with Light Charges in your inventory
- Hold primary attack — the charge bar should appear
- Release before 1s → normal thrust (no ammo consumed)
- Hold for 1s → thrust animation + crystal bolt fires from the sword tip
-
Test the special attack:
- Hit enemies with charged bolts to build SignatureEnergy (+5 per bolt hit)
- When the sword glows (100% energy), press Ability1
- A large Crystal Light Orb should fire with an explosion effect
Common errors and fixes:
| Error | Cause | Fix |
|---|---|---|
Failed to validate asset | Inline Type: "Projectile" interaction | Extract to a named file |
| Projectile exits from head | SpawnOffset not set | Add SpawnOffset with Z: 1.5 to move it forward |
| Ammo consumed without projectile | RunTime on a Type: "Projectile" | Use Next: { "Type": "Simple", "RunTime": 0.2 } instead |
| Infinite rapid fire | Replace Var pointing to its own override | Reference interactions directly, never self-reference |
| Charge bar not visible | DisplayProgress missing | Set "DisplayProgress": true on the Charging interaction |
| Special never activates | No EntityStatsOnHit in damage | Add EntityStatsOnHit with SignatureEnergy amount to damage interactions |
File Structure Summary
CreateACraftingBench/ Server/ Entity/Damage/ Crystal_Light.json Projectiles/ Crystal_Light_Bolt.json Crystal_Light_Orb.json ProjectileConfigs/HytaleModdingManual/ Projectile_Config_Crystal_Light_Bolt.json Projectile_Config_Crystal_Light_Orb.json Item/ Interactions/HytaleModdingManual/ Crystal_Light_Bolt_Damage.json Crystal_Light_Orb_Damage.json Crystal_Sword_Charge.json Crystal_Sword_Charged_Entry.json Crystal_Sword_Shoot_Bolt.json Crystal_Sword_Shoot_Orb.json Crystal_Sword_Special.json RootInteractions/HytaleModdingManual/ Crystal_Sword_Special.json Items/HytaleModdingManual/ Weapon_Arrow_Crystal_Glow.json Weapon_Sword_Crystal_Glow.json (updated)Next Steps
- NPC Shops and Trading — sell Light Charges at a merchant shop
- Custom Loot Tables — make enemies drop Light Charges
- Projectile Config Reference — complete schema reference for all projectile config fields